So you’ve just got your shiny, new, free copy of Vital and you want to install some presets. In this article, we’re going to show you exactly how to install, and manage your preset banks in Vital, on both Windows and Mac.
Here’s how you can install Vital preset packs quickly:
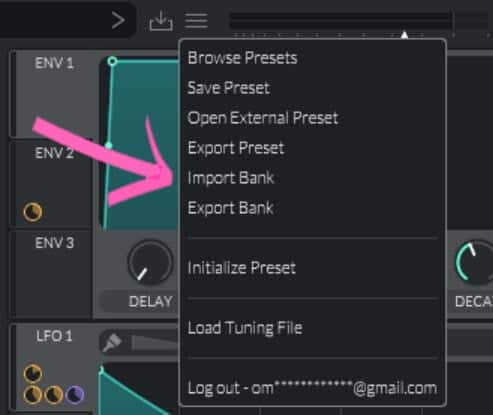
- Open the 3 line menu and click “import bank”.
- Locate the .vitalbank file of presets you want to install.
- Click on them and press “open”.
- You’ll now have your presets in a folder inside the Vital preset browser.
How To Import Vital Banks
If you’ve got a bank of Vital presets (.vitalbank file extension), it will include everything you need to run those presets. So, that means you’ll have wavetables, the preset patches, samples and custom LFO shapes.
To install a Vital bank:
- Select the 3 line menu from the dashboard. We’ll be using our free Synthwave pack.
- Then select “import bank”.
- Find your downloaded your files on your computer.
- Hit “open”.
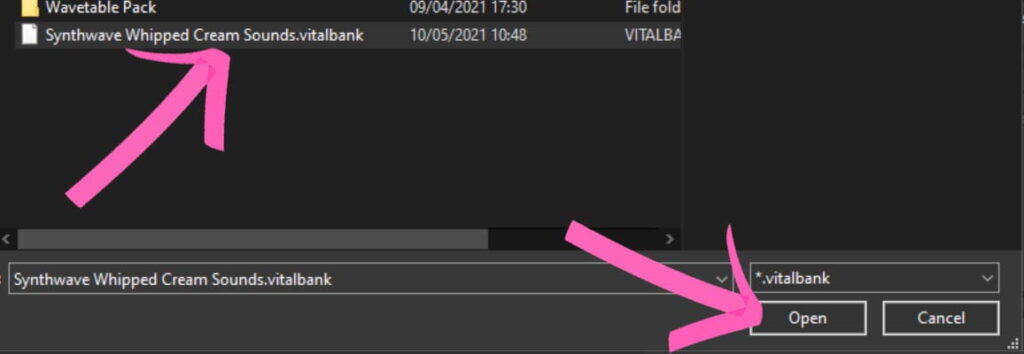
Now your presets will show up inside Vital, and they’ll have their own folder. Just browse for presets like you normally would, and select your newly installed synth patches!
How Do I Import Single Presets?
Go to the menu section. Instead of selecting “import bank”, you select “open external preset”. Then navigate to the install location of this preset and open it.
You can also place these presets in Vital’s default folder (which is preferred):
- Windows: C:\Users\[userName]\Documents\Vital\User\Presets
- Mac: /Library/Audio/Presets/Vital
You must place the preset in the default Vital folder to have it permanently inside Vital when you open it.
If you don’t, you’ll have to continually open external presets through the menu. So make sure you’ve located this folder, and then just drag and drop your preset over.
Make sure to place it in the User\Presets location, otherwise Vital will not pick it up.
Then re-load your Vital instance, check the preset browser, and you should see it showing up in your user directory.
If you’d like to install a folder of custom presets, you’d simply put it in a Folder like this: *custom_preset_pack_name*\Presets\*paste your presets here*
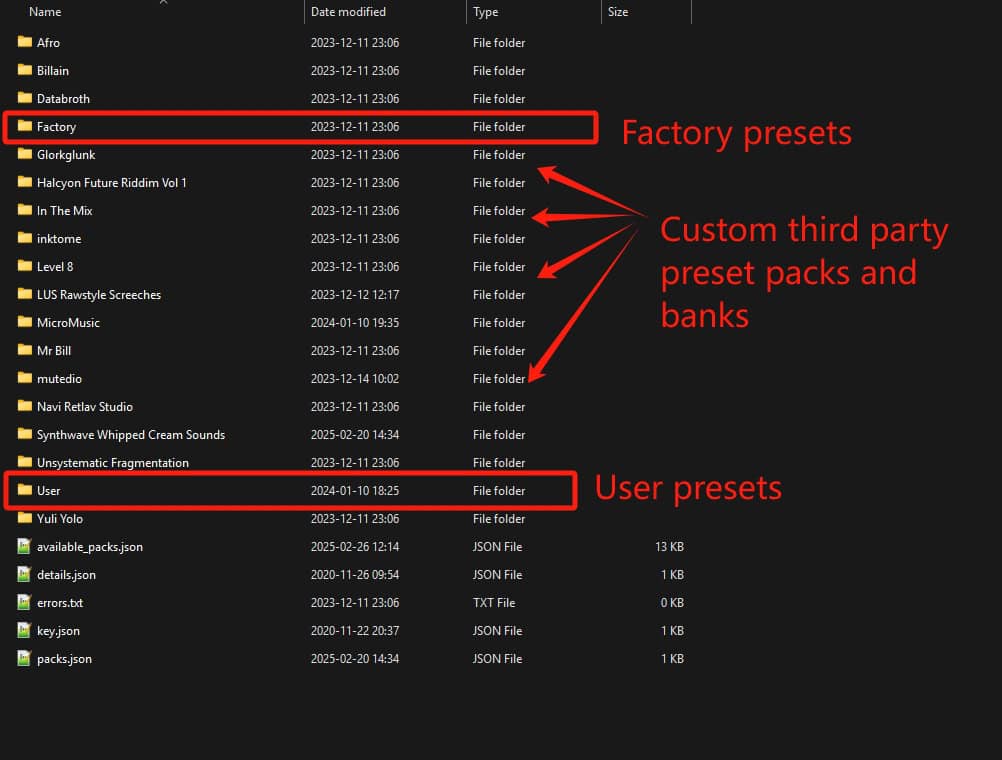
How Do I Find The Default Vital Preset Folder?
For whatever reason, you might want to find the default preset folder. Either to install presets, or maybe do some file cleanup.
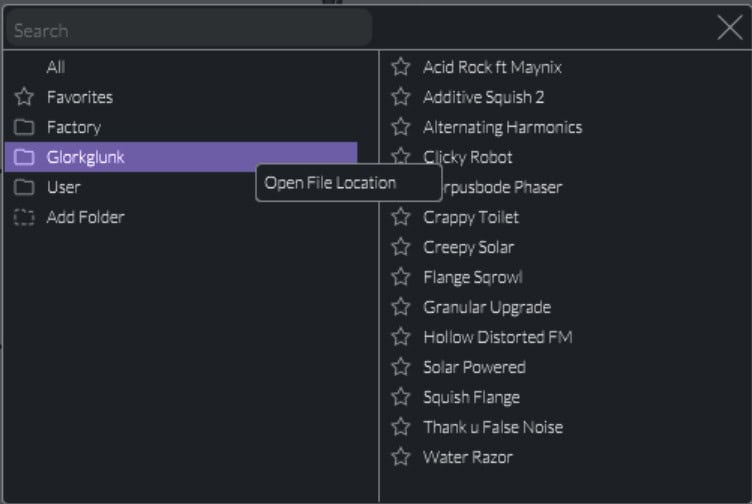
To find Vital’s default preset folder:
- Navigate to Vital’s preset browser.
- Click on all at the bottom left.
- Right click it.
- Click “open “file location”.
- Now you’re inside the default folder.
You can add folders here to categorize your presets however you like. This might make navigating Vital when you’re making some music much easier to do.
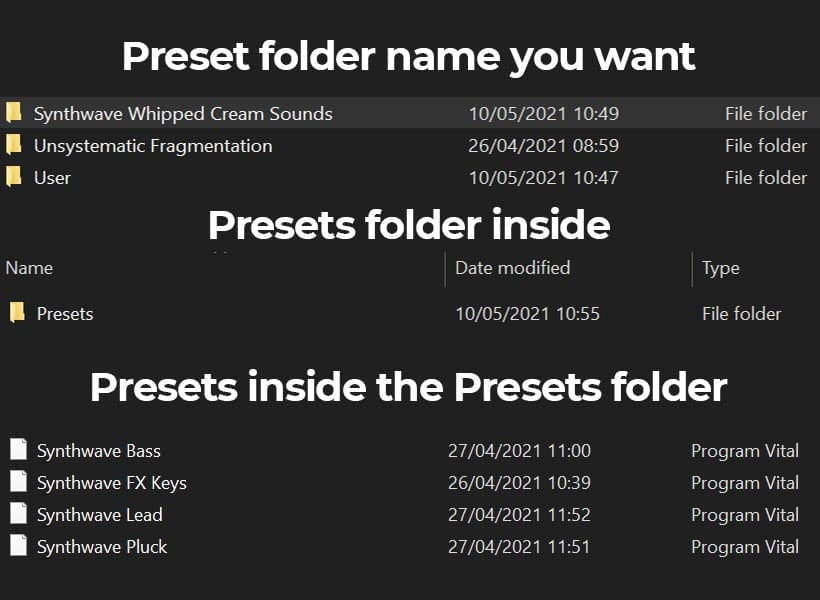
When making custom preset folders, you’ll have to have another folder inside. For instance: Synthwave Whipped Cream Sounds, will have another folder inside called “Presets”. Vital will not pick up your presets unless they’re inside this folder. You’ll then copy and paste your presets inside this folder.
I’ve Downloaded A Zip File, What Do I Do?
Sometimes you might get Vital presets inside a zip file, or an archive file. If the person has laid them out in the correct structure, you’ll need to change the extension name of this archive to .vitalbank.
Then you would install bank like we showed above.
If the archive file hasn’t come in the proper format, you will have to unzip the files, and copy the presets into a new folder like this:
*your_folder_name_here*\Presets\*paste your presets here*
Then paste all your presets inside that “presets” folder you just made.
It’s important to add this folder, otherwise Vital won’t pick them up. If you just make a folder without the “Presets” folder inside, it will not show up.
After doing this, just re-load Vital and you will be able to see your new presets in the browser, in their neat folders 🙂
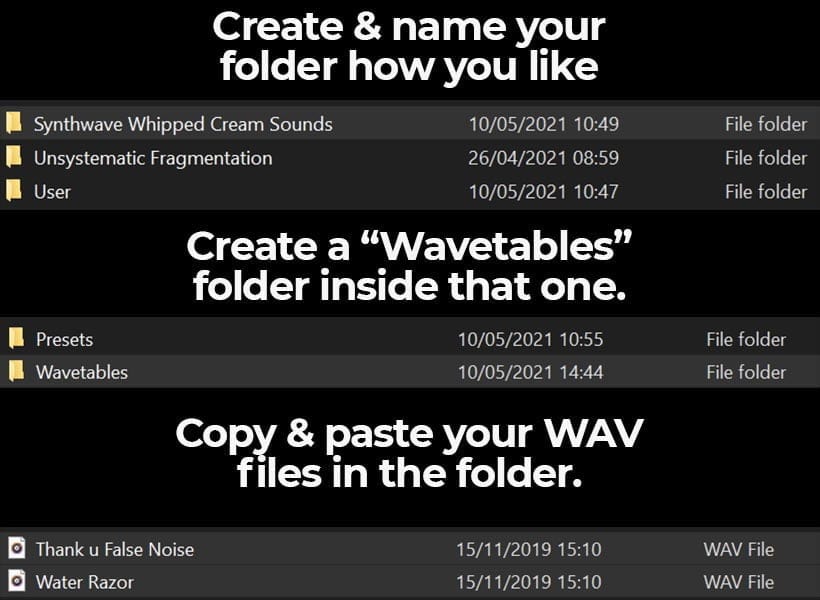
How Do I Install Custom Wavetables?
Custom wavetables are pretty much the same process as the rest in Vital.
The only difference is, you’re going to replace that “Presets” folder with… you guessed it a “Wavetables” folder.
If you have a .vitalbank file, you simply follow the same process as installing the preset banks, as listed above.
If you have separate files downloaded, you’ll have to copy and paste your wavetables in the user directory.
Here’s our quick guide to installing user Wavetables in Vital:
- Go to open a new wavetable shape.
- Right click on the “user” folder and click “open file location”.
- Copy and paste your wavetable files in here.
If you want to install a Wavetable pack, and have it in neat folders, you’ll have to navigate to:
Windows: /Vital/Factory Content/Vital
Mac: /Library/Audio/Presets/Vital
Then you will create a new folder inside this location and call it the name you want to show up inside the wavetable browser.
After doing this, you’ll open this folder and create a folder called “Wavetables” inside. Then you’ll copy and paste your wavetables in there.
How Do I Install Custom Noise Samples in Vital?
To do this, you follow the exact same steps as above, but you will create a folder called “Samples” instead of “Presets” or “Wavetables.
You shouldn’t have to do this if they are included in a .vitalbank file. However, if you don’t have a .vitalbank file, you will need to create your own folders like shown above.
Here’s a quick way to install samples in Vital:
- Open a new noise sample browser.
- Right click on the “User” folder and click “open file location.
- Click on the “Samples” folder.
- Copy and paste your WAV files here.
- Re-load vital.
Summary
We hope this tutorial helped you figure out how to install Vital presets. Let us know if you have any questions, and be sure to check out our Vital Preset Recipes section for more free Vital presets and the exact step-by-step on how to recreate them on any synthesizer!

Harry Jackson is a DJ, Music Producer, and Entrepreneur based in Birmingham, UK. He is the founder of music production website Whipped Cream Sounds. Harry writes detailed tutorials covering everything from production & sound design to marketing and music theory. He produces primarily Lo-Fi under the alias Lofti.