So you wanna know how to install Serum presets? In this article we’re going to cover everything you need to know when installing new Serum presets, wavetables, & even skins!
Table of Contents
Remake Any Sound With Serum
Master how to program Serum with Syntorial’s Serum lesson pack and remake any sound by ear. Download the demo and try the first 20 lessons, on the house.
Installing Serum Presets
TL:DR; Here’s how to install Serum presets:
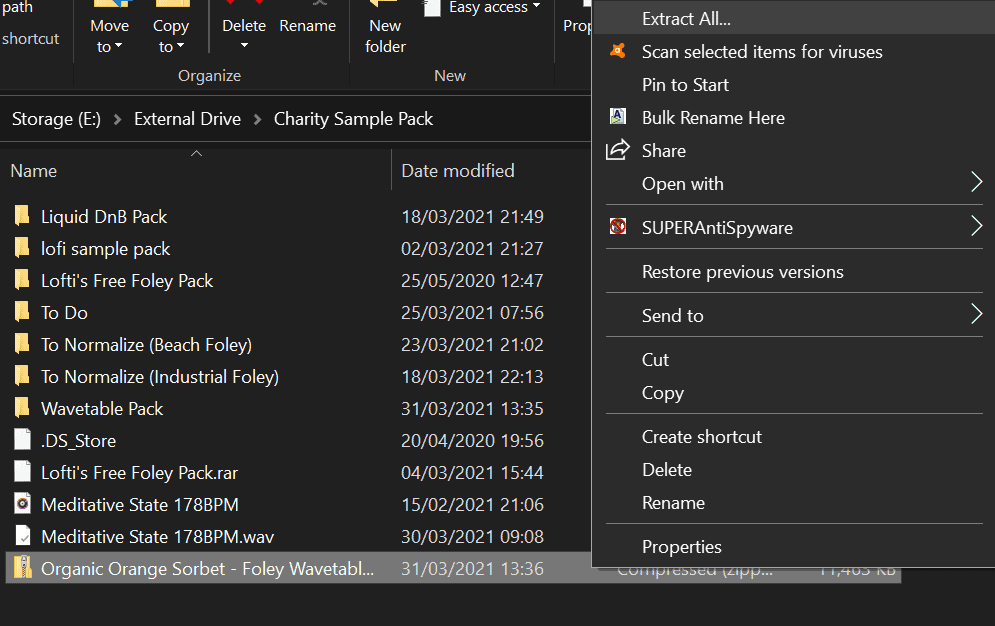
- Download your Serum presets (fxp files or zip/rar archives).
- If it’s an archive: right-click and extract all (Windows), or double click the file (Mac).
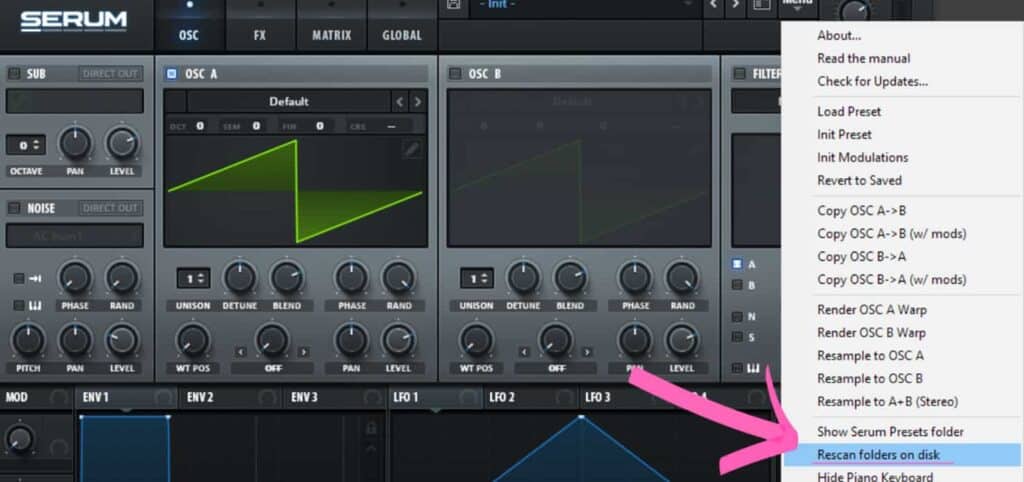
- Navigate to your Serum presets folder, by clicking “menu”, then “show serum presets folder.
- Drag your downloaded presets into this folder.
- Rescan folders on disk, or open and close your DAW.
1. Download The Preset or the preset Pack
Firstly you’ll want to grab individual Serum presets or a preset pack. Check out the presetshare.com bundles for free packs.
2. Unzip The Serum Presets
Once you’ve downloaded your Serum presets, you’ll notice that they usually come as a .zip or .rar file. These allow the files to be smaller to download, and, as a result, quicker to download.
To access the files inside, you’ll need to unzip them.
If you’re using Mac you just need to double click the zip file, and it will start unpacking for you.
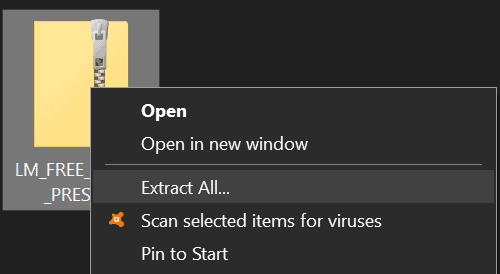
On Windows, simply right-click & select “Extract all“, and it will begin the process.
If you have WinRar installed (an unzipping program), you right click and select “Extract Here”. WinRar is generally better for handling zip files over the Windows 10 built-in stuff.
Also a lot of Windows users tend to use .rar files and these can only be opened using WinRar on Windows.
Remake Any Sound With Serum
Master how to program Serum with Syntorial’s Serum lesson pack and remake any sound by ear. Download the demo and try the first 20 lessons, on the house.
3. Finding The Serum Presets Folder
Now you have your files unzipped, you need to put them in the right directory, so they can show up inside Serum.
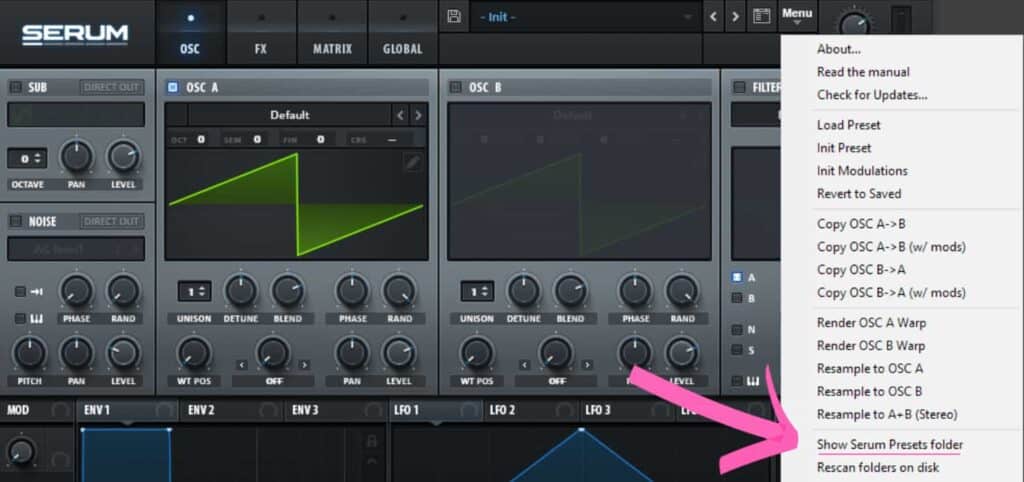
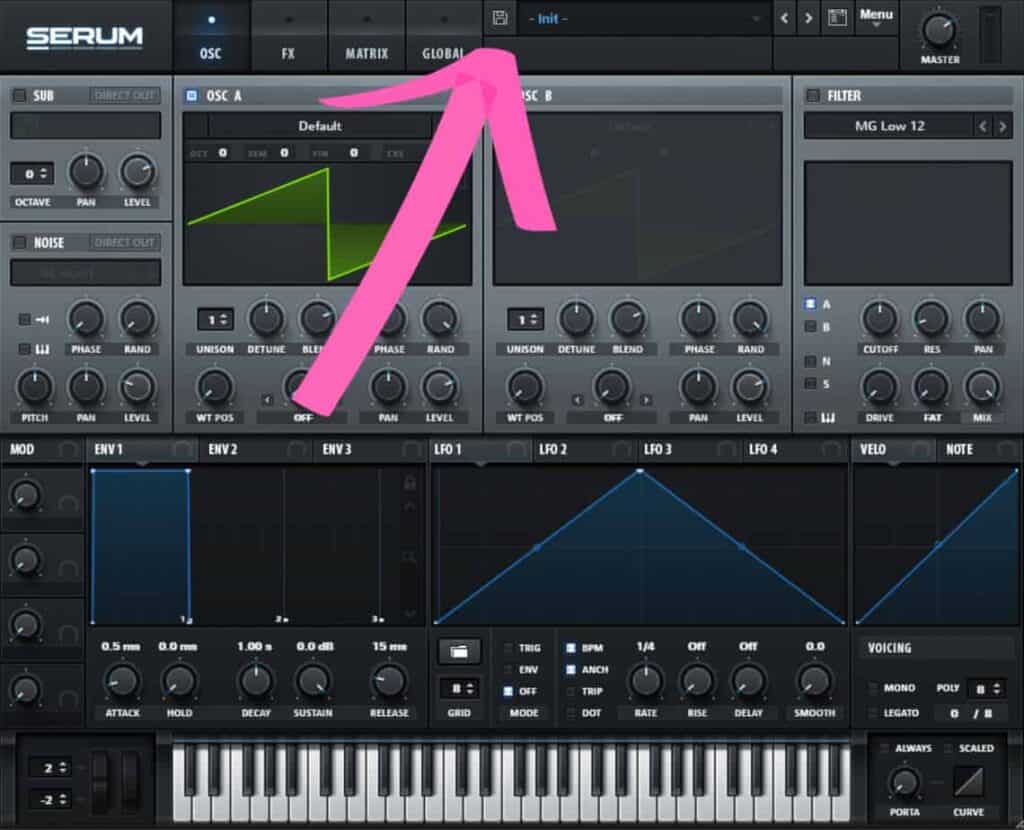
To find this, open up an instance of Serum inside your DAW, click “menu” in the top right corner, then navigate to “show serum presets folder”.
This will open up a new folder window, then you navigate to the “presets” sub folder, then the “user” sub folder.
Serum’s presets are stored in:
- macOS:
~\Library\Audio\Presets\Xfer Records\Serum Presets - Windows:
C:\Users\[YourName]\Documents\Xfer\Serum Presets\
4. Move Your Presets to The Folder Of Your Choice
Now you can drag and drop your presets here.
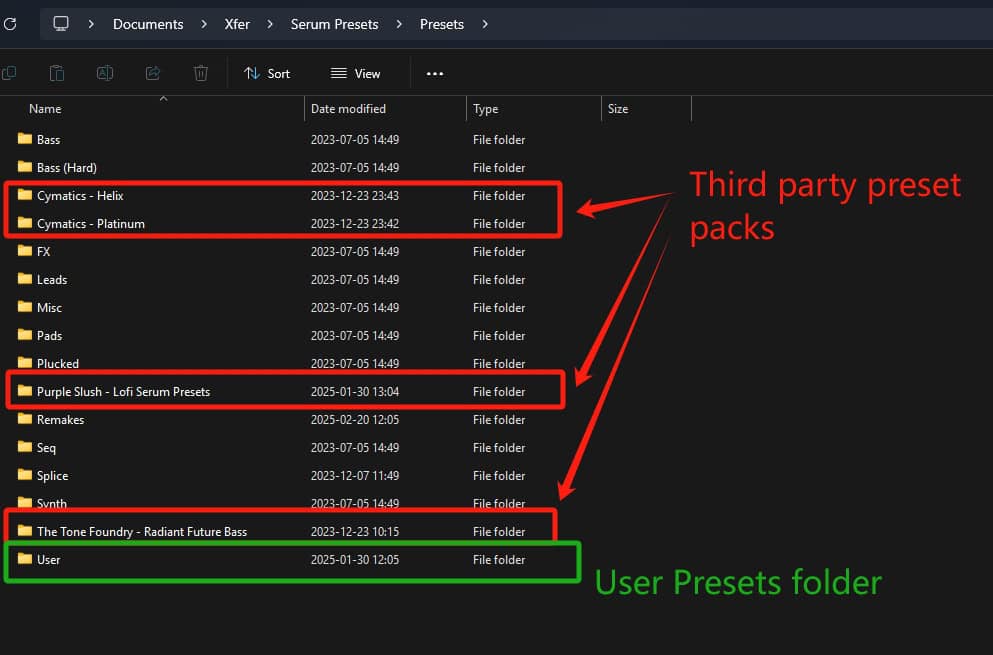
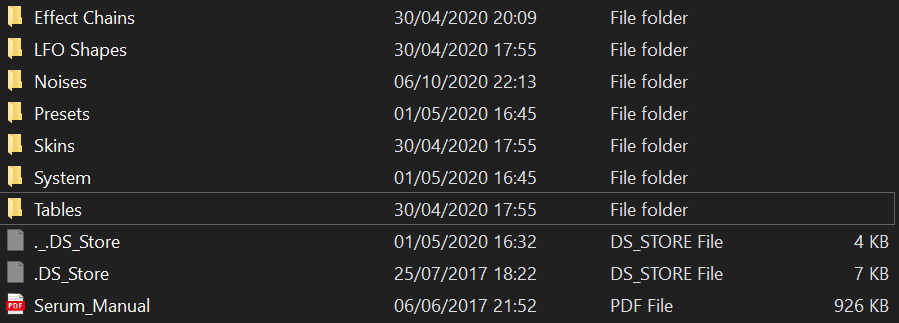
Within this folder, you’ll find the main categories:
- Presets/
- Bass (Default factory presets)
- Lead (Default factory presets)
- etc.
User(Where your own presets go)
- Noises/ (Custom noise samples)
- Skins/ (Custom skins)
- Tables/ (Custom wavetables)
Should I Create Subfolders?
Yes! Organizing your presets into subfolders inside Presets/User/ is a great idea. Some common ways to structure them:
- By Type (e.g.,
Basses,Leads,Pads,Plucks,FX) - By Genre (e.g.,
Techno,Trap,Ambient) - By Project or Artist (e.g.,
MyAlbumSounds,Artist-Inspired) - By Sound Design Style (e.g.,
Analog Emulations,FM Experiments)
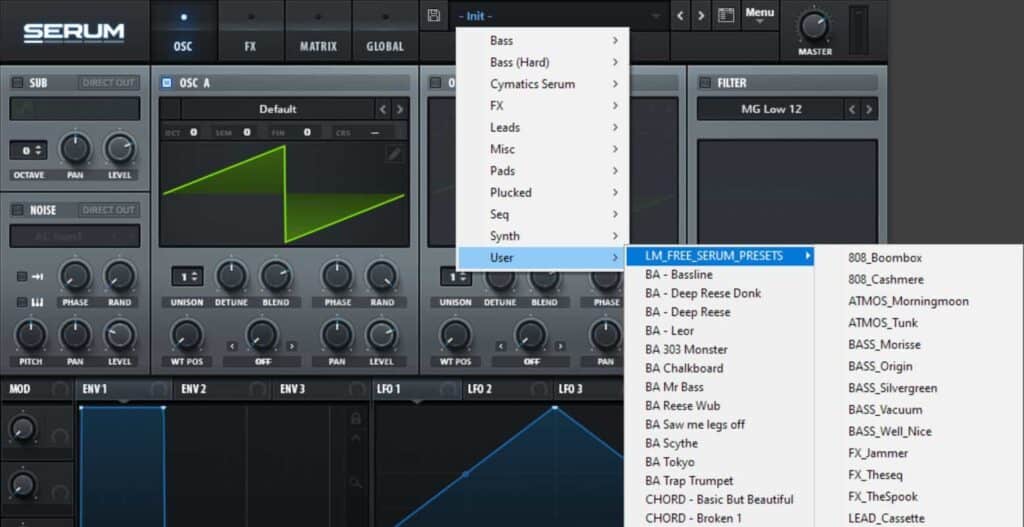
Serum will read any subfolder inside /User, so you can browse them directly from Serum’s browser.
Should I Put Preset Packs In The User Folder, Or Right In The Root?
Whatever works for you. I personally prefer putting 3rd party preset packs right at the root of the /Presets folder, and use the /User subfolder for working files and project: presets I’ve developed myself, or tweaked presets. See the screenshot above.
Here is what the the folder structure could look like:
/Presets/
 ├── Factory/  (If you want to separate them)
 ├── User/     (All your custom-made presets)
 ├── Third-Party/
 │    ├── Cymatics - Helix/
 │    ├── Splice/
 │    ├── [Other packs]
5. Rescan Presets Folder
Then you want to head back to the “menu” option in Serum, click it, then navigate down to “Rescan folders on disk”.

This will rescan your preset folders allowing Serum to find the new presets you just installed.
Now all you have to do is check your Serum preset browser, hover over “user”, and you will see your new presets show up!
Remake Any Sound With Serum
Master how to program Serum with Syntorial’s Serum lesson pack and remake any sound by ear. Download the demo and try the first 20 lessons, on the house.
How To Install Wavetables in Serum
Step 1 – Download Your Custom Wavetables
Find a Wavetable pack you want to install inside of Serum. I’m going to use our organic orange sorbet wavetable pack (made out of deliciously organic foley).
Download it to your computer wherever you like, but remember you’ve got to find it. Playing hide and seek with your computer files isn’t fun.
Step 2 – Unzip Your Wavetable Pack
Like with the Serum presets above, you’re gonna have to unzip them.
On Mac because lord Steve Jobs made everything easy for the price of 2 computers, you just gotta double click the file.
On Windows, you gotta go a step further, which is not optimal producer workflow. Right click on the zip file, then select “Extract All”
If the pack is a .rar, you may also need to install some 3rd party software. WinRar is best.
Step 3 – Find Serum’s Wavetable Folder
Now your files are unzipped, you need to find the wavetable folder. This is pretty much the same process as finding the presets folder, but you’re going to click a different folder called “tables”.
So open up an instance of Serum in your DAW, click “menu” (top right), then navigate to “show serum presets folder”.
This will open up an explorer window on your computer. You’ll want to go to the “tables” folder, instead of the “presets” folder this time.
Then you’re going to drag that extracted folder into the tables folder.
Step 4 – Rescan Wavetables
Once your wavetables are inside your “tables” folder, they won’t automatically show up inside Serum, unless you rescan.
To do this, you want to go back to the “menu” option, at the top right of Serum. Select this, then navigate to “rescan folders on disk”.
Once you have done this, you will be able to use your new wavetables in the same way you would use the normal wavetables on Serum.
Remake Any Sound With Serum
Master how to program Serum with Syntorial’s Serum lesson pack and remake any sound by ear. Download the demo and try the first 20 lessons, on the house.
How To Install Serum Skins
This is virtually the same process as the above. Instead, you’ll want to navigate to the “skins” folder.
You’ll then take your extracted files, and drag and drop them into this folder.
Then rescan the folders inside Serum.
To change your skin, you’ll want to click the top left “Serum” logo. This will open up a navigation window you can use to change your skin to the new skin you installed.
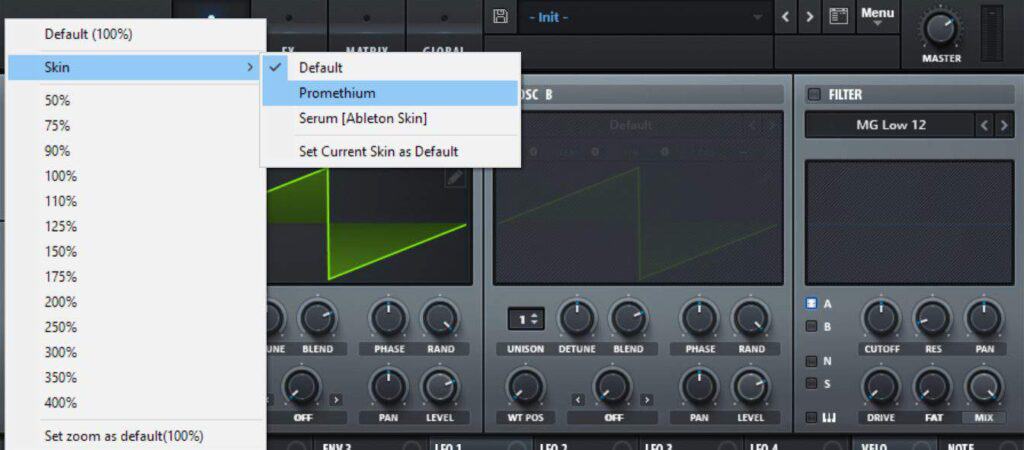
Click the desired skin, then start using Serum!
FAQ
- On a Mac: \Library\Audio\Presets\Xfer Records\Serum Presets
- On a PC: \Documents\Xfer\Serum Presets
As mentioned above, if you are unsure about your serum presets folder location, you can always use the menu prompt “Menu > show serum presets folder”
Locate first the default serum preset folder location (Mac: \Library\Audio\Presets\Xfer Records\Serum Presets, PC: \Documents\Xfer\Serum Presets, or Menu > show serum presets folder) then check if the folder exists and contains files and subfolders.
- Solution 1: if the folder doesn’t try to disable your antivirus or anti-malware software and run again the full installer (not just the update)
- Solution 2: if the folder exists it may be a Mac permission issue. Open your terminal and run the command sudo chmod -R 777 /Library/Audio/Presets/Xfer\ Records/
- Solution 3: the folder exists but the path is using non-ASCII characters (e.g. accented characters, Chinese or Arabic characters etc.): remove the non-ASCII characters
When your preset library is ever-growing in size (especially when wavetables are attached to them) you may want to move it to an external drive instead of the system one. To do that, just make a copy of the preset folder into the new location and then delete the original one. On next run Serum will prompt you with a “Serum preset folder not found” message & will prompt you to point it to the new preset folder. Just make sure to keep the folder content structure & subdirectories identical, and to avoid non-ASCII characters in the folder path.
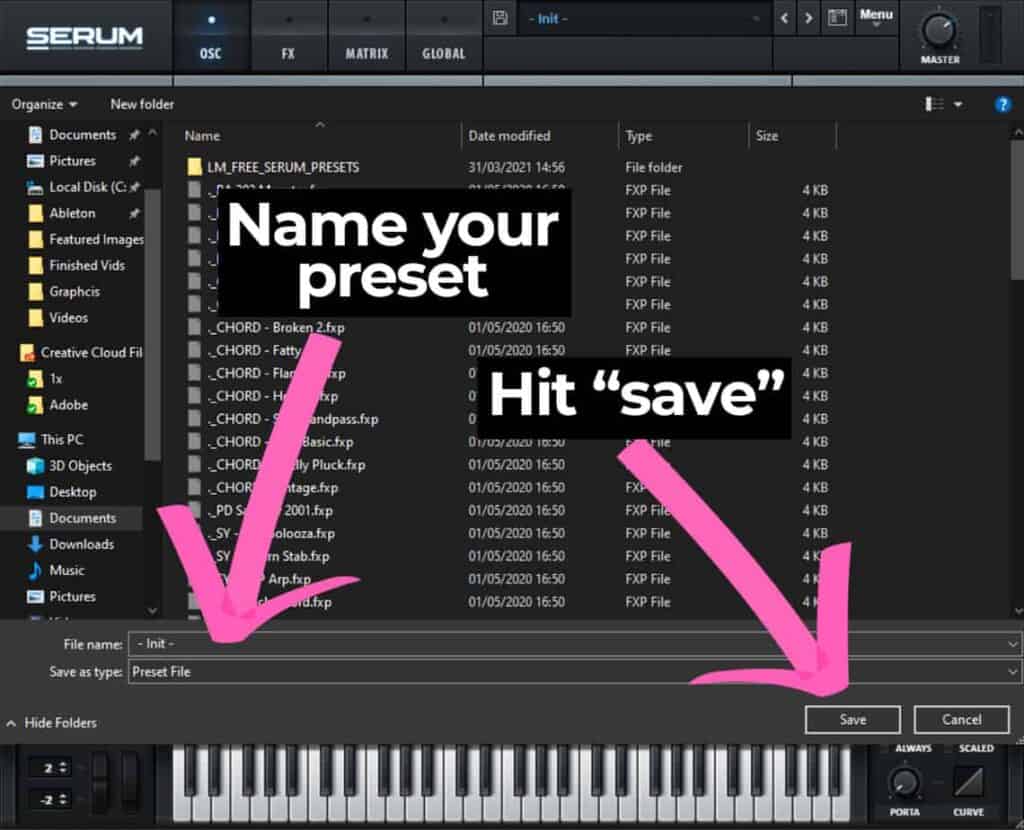
Very easy: after you’ve made a sound you’re happy with, you can just click the floppy disk icon 💾 on the left of the preset name bar, then select the subfolder where you want to store it. The saved files are under the file extension .FXP and are cross-compatible PC & Mac
This will open up a folder window where you can name, and save your preset.
Choose a name for your preset, then hit “save”. Your preset will now be saved for use another time. You can then find these saved presets in the “User” folder.

Harry Jackson is a DJ, Music Producer, and Entrepreneur based in Birmingham, UK. He is the founder of music production website Whipped Cream Sounds. Harry writes detailed tutorials covering everything from production & sound design to marketing and music theory. He produces primarily Lo-Fi under the alias Lofti.